A Path Beyond
-Milo234
This strategy guide to A Path Beyond will be an attempt by me to systematically and thoroughly explain everything I know about how to play path. This guide will be split into 2 sections for the 2 pairs of starting spots.
General Information:
On Westwood Chat this was by far the most popular map and all of the best path players (I’m very serious, ALL) ever spent considerable time playing path on westwood. On ww the spots for each game were predetermined in such a way that it was possible to make the game TR vs BL every time, for which reason my TR vs BL section will probably be a lot longer than the TL vs BR section.
TR vs
BL
General Strategy:
If you compare the money available to TR and BL you will find that TR has a huge long term money advantage, however on the other hand BL has a considerable short run money advantage. This advantage is great enough that allies have considerable trouble building as TR. Therefore the conventional wisdom is that BL should rush and TR should defend. This obviously doesn’t have to happen every game, but in general that is how more than 90% of my games on path TR vs BL have gone.
TR
Scouting
Since TR tends to defend it is extremely important to block off as much of the map as possible from the enemy, and the best way to do that is by putting guards at the locations pictured below:
Insert TR Guards Picture
Of course some scouts are necessary too and here is the order I like to go my scouting/guarding
Primary Scouting Order
1. 1 guard to left bridge
2. 1 guard to right bridge
3. 1 scout to BR
4. 2 guards to BR
5. 1 scout to TL
6. 2 guards to TL
7. 4 grenader bridge blasters to right bridge
Notes about Primary Scouting Order:
· Left bridge guard is sent all the way to BL corner, then later when all the other riflemen are sent, everything should time out right and you should be able to get back in time to stop him at the edge of the bridge.
· Right bridge guard – I like to Q him over the top of the lake and straight down then he will end up directly on the right bridge. Stop him on his bridge immediately after stopping the left bridge guard
· TL and BR scouts are next sent towards BL in order to uncover the maximum possible amount of the map with the fewest scouts.
· Everything should time out just right so that in the time it takes to make 4 grenader bridge blaster all scouts/guards can be stopped/resent to the important parts of the map but this takes practice.
· The bridge blasters are very important. If BL manages to rush across the bridge it can become very hard to defend (conversely if TR blasts the bridges it can become very hard to rush). In this order I say blast the right bridge first, however in practice you want to blast the bridge closest to BL’s base, i.e. if BL builds up you want to blast the left bridge first and if BL builds right you want to blast the right bridge first. I personally feel that a rush across the right bridge is more devastating than a rush across the left bridge so by default I say blast the right bridge first.
· Efficiency is key. You cannot make lots of scouts on standards because the money will run out, so you have to constantly do things like use your dude from selling your barracks to scout, using your guards later on to scout, reusing your bridge blasters to explore and kill enemy guards, look out for enemy scouts and pick them off early if you can and many other things. Just because you finish the basic scouting pattern it doesn’t mean you are done scouting and exploring the map. You must also constantly be on the lookout for what’s going on across the map.
Weaknesses in Primary Scouting Order:
- No matter what TR does, BL can always get a first grenader scout past TR’s right bridge guard. This obviously leaves other holes in BL’s guard position but it can work.
- A left bridge grenader scout from a BL up build will work if u don’t perfectly stop your left bridge guard in time, but this also gives you the important information that BL is building up.
Secondary Guard Placements
Insert secondary
scouting placement picture.
This guard method is very solid but also leaves BL a lot of space to get in and see what TR is doing. All of the top players I have played always blocked off half the map anyway and this method was used mostly by lower ranked but still decent players.
Builds
Following all of the given orders cy selling immediately is entirely appropriate, however continuing to build more ore refs can be fine too. Getting a 4th war factory isn’t of great value but it can be done. If the game lasts much longer than the time it takes to carry out the entire build listed then BL will probably be at a large disadvantage anyway.
Selling barracks is implied in all of these build orders. Barracks is to be sold before placing 2nd war factory (to prevent low power) however when to sell it is up to the discretion of the player.
Basic TR No Truck
Build 4 o 3 w
Order - p b o w w p o p o o w
Placement:
This build works great against BL no truck early rushes, and is generally good against BL right builds.
Warrealm told me he could do 3 o 3 w TR no truck however I find this is rather difficult to do and nearly impossible without extremely good gem picking, however it is indeed possible.
Basic TR 3 o 3 w 1
truck
Order – p b o w w p o p o w
Placement:
This build can be done with the truck first thing or with
the truck at 2nd war or even as late as after 6-8 tanks.
Upon making an extra truck doing 3 o 3 w becomes rather easy and isn’t very
hard to keep money with.
Making a truck first leaves you open to early rushes and thus it is very important to bridge blast whenever you use a truck first build.
Basic TR 2 o 3 w 1
truck
Order – p b o w w p o w p o
Placement:
This build can work great but can be tricky for money. As always when making a truck first beware that you might get rushed. This build will be hard to do if you make the extra truck later if not impossible.
Basic TR Down Build 2
o 3 w 1 truck
Order – p b o w w p o w o
Placement
Insert 2 o 3 w 1
truck Down Build Picture
When building down it is absolutely essential to get off blasting the bridges or you can get majorly screwed over.
When doing this build you should send an ore truck to mine the gems in TM even though it seems far away.
This build can be hard to do and keep money with.
Money Management
On all standard maps money management is an essential skill to master so this section will take a quick look at money management tricks for path TR.
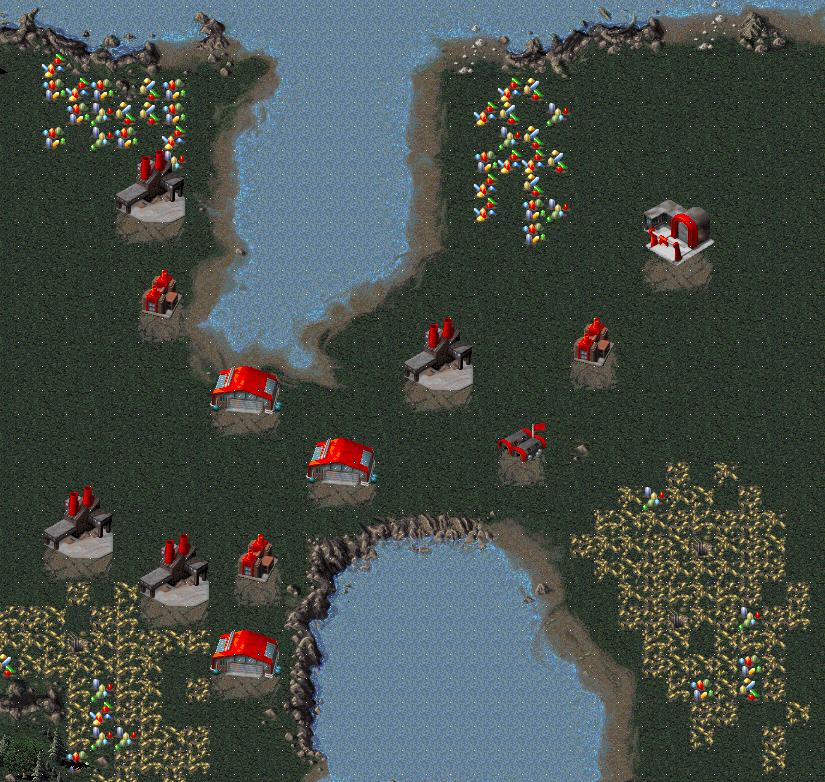
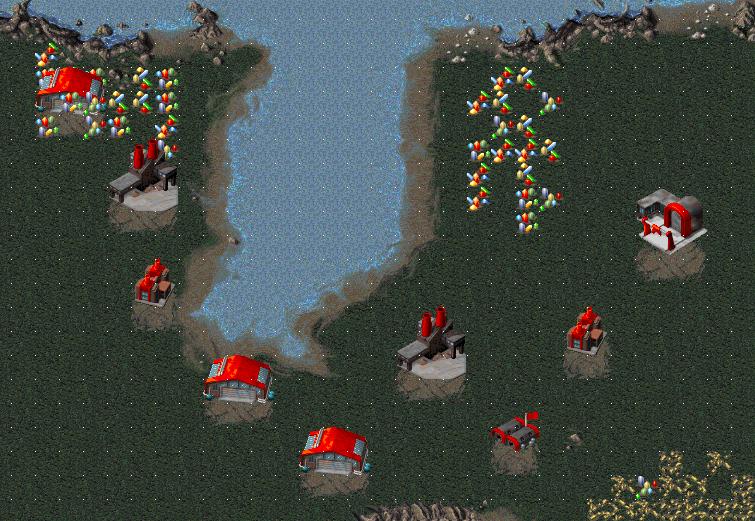
The first thing to notice on any standard map is where the gems are. This picture points out where all of the important TR gems are:

The first gem patch to mine is directly to TL of your CY
If the ore truck optimally mines these gems, it will mine a number of full loads then on its last load will get 1 insignificant gem. It is better to then send the truck on to pick other gems below the cy rather than get the last insignificant gem in this patch
The next big gem patch to mine is the gem patch in TM
This gem patch too has quite a few full loads of gems in it, and if the ore mines it optimally it’s last load will be 1 little insignificant gem and it is best to control your truck and send it to the middle to mine other gems rather than waste a few seconds on the last gem. This is the gem patch that TR should expand his base to get the 2nd ore ref near.
The first opportunity to pick gems as TR is the gems below the CY.
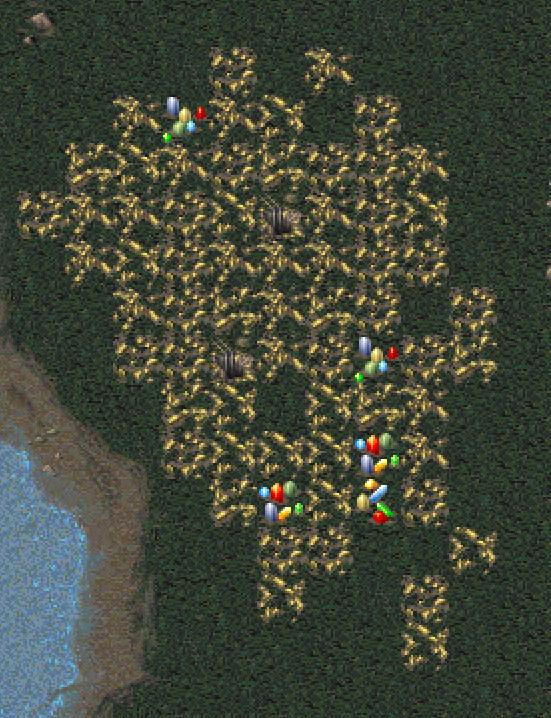
These gems should take 2 ore truck trips to mine. Upon completely mining these gems and the gems above the cy it is ok to let your first ore truck mine the ore below the cy.
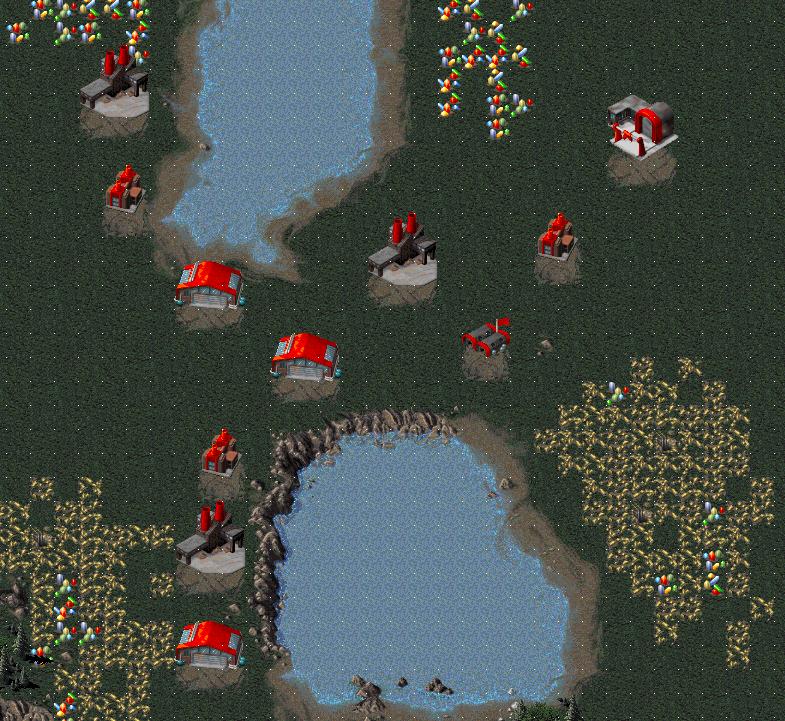
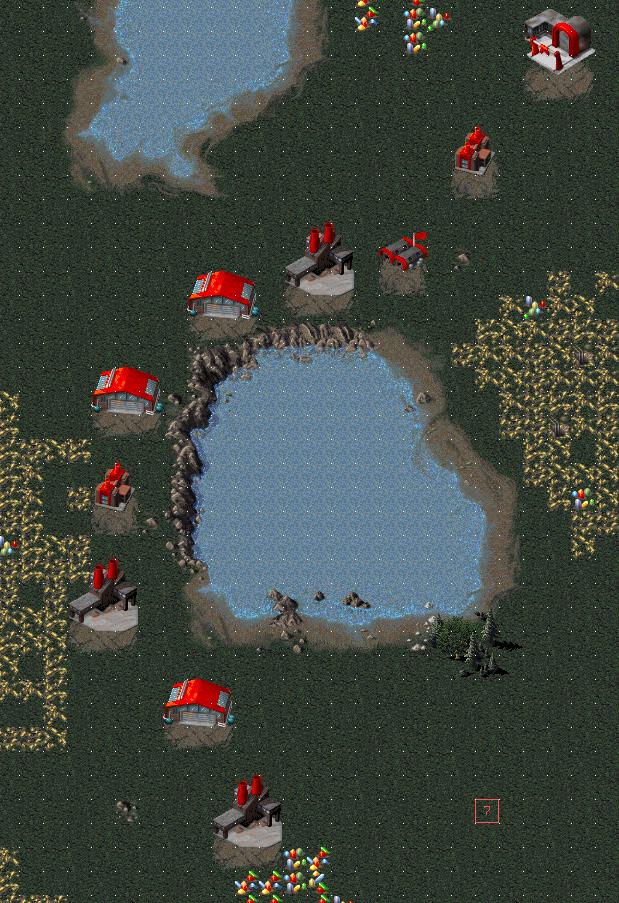
The big long term money advantage TR has is due to the gems in the middle of the map.

How well you pick these gems will determine whether-or-not you can keep money as the game progresses. Note the several marked gems in the picture. If you send your ore truck to mine any one of the marked gems in the picture, it will continue on to mine a 2nd gem and this will minimize the amount of ore truck control you have to do.
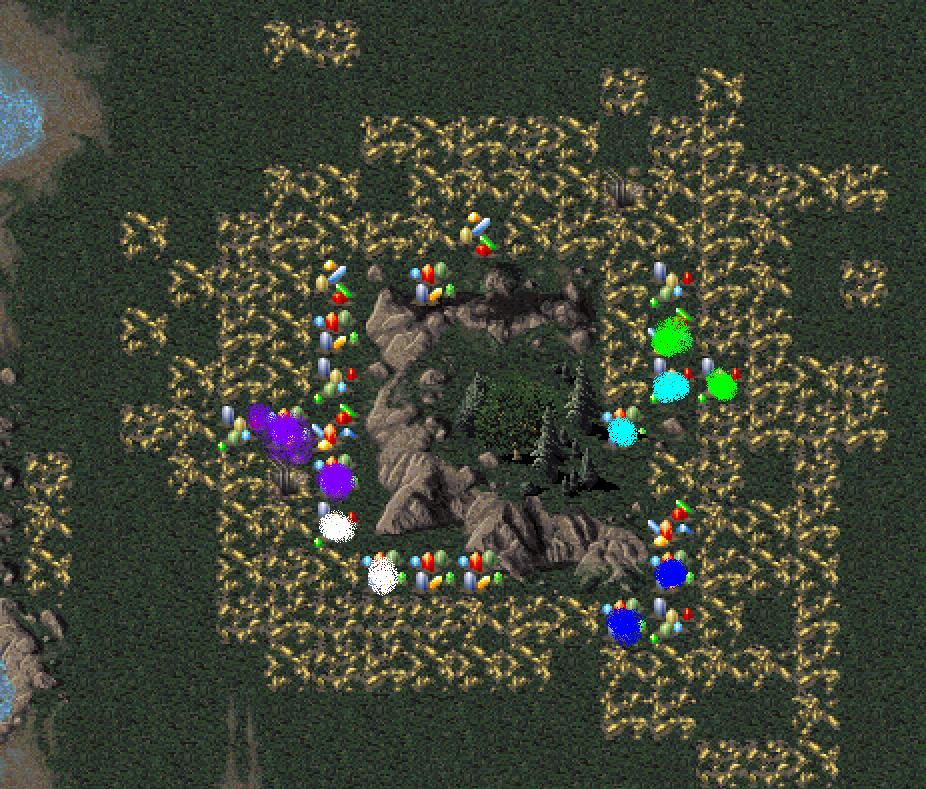
The next aim after the middle is the gem patch below the lake.

Upon mining all the gems in the middle this is the next area and usually the last area to aim for.
TR
Defending/Attacking
Since the conventional wisdom is that TR defends and BL rushes, TR should generally be more on the defensive side. If TR can successfully blast the bridges, defending becomes much easier. Maximize how far into the opponent’s base you can see so that you will never be caught off guard when the rush comes. The earliest rushes are normally 4 tank rushes, so by the time you make 4 tanks, you should start moving your tanks below the lake to await eminent attack. It is extremely difficult to rush through TL since the gap between the ridges is rather small so almost all rushes will come from BR. Thus, always be looking at BR. The sooner you see the rush coming, the more time you have to prepare to defend.
When BL rushes straight up from BR, the best place to meet the enemy tanks is in the ore patch in BR. Try to block the lead tanks and make them stop. Stopped tanks are far easier to pick off than moving tanks. As the tanks continue moving up, be ready to Q up in front of them. Always try to stay ahead of the rush. If one or two, or even three tanks get by you, it’s not that important. The main thing to focus on is stopping the main force of the rush from annihilating your base. Let the 1 or 2 front tanks that get by go and focus on killing off the rest of the group. Even if you lose your CY it should not be fatal as long as you have at least 2 ores 2 wars and 2 powers. There is no particular great advantage on path to making lots of buildings.
BL may also split the rush when coming up from BR and also cut left when going under the lake. If this happens the conventional wisdom is to pick off the more important group, which is usually the group that is likely to kill all of your war factories. Remember that cys don’t really matter at all so make sure you save the main tank producing part of your base.
If BL splits his tanks between TL and BR and attacks, then be ready to defend both areas at once with similar size tank forces for each corner. Defending 2 fronts at once is not impossible but is rather difficult. As said above it is ok to just defend the more important group and let the other group go.
TR return rushing should generally be done from TL direction, however it can be ok to return rush from BR if BR is much closer to your tanks than TL, or if you are expecting follow up attacks by BL in this direction. If BL builds right or if BL builds up, either way most of BL’s important financial resources are on the left side, thus TL is the more important direction to attack from.
Attacking is easiest done using the bridges, and the closest bridge to BL’s cy is the left bridge. Thus if TR wants to attack across the bridges the easiest thing to do is to use the left bridge and pressure BL. If BL loses his CY early, long term money will be bad and the result shoul be nearly fatal if BL can’t manage to pull something great off with the return attack.
If BL builds right then the left bridge is the only bridge to use. If BL builds up however it can be ok to use the right bridge to attack the op’s cy. Bridge rushing can be very risky if the enemy is ready for it, but if they are caught off guard it is extremely effective.
If TR chooses to attack after the bridges have been blasted, the usual direction to attack from is TL. If TR gets to TL before BL is rushing in BR, then base trading becomes a bad idea for BL( as the general rule of base trading is whoever is closest to the enemy’s base will win) and BL is stuck somewhere between a hard spot and a rock. BL cannot possibly hope to get off a good rush from TL if TR knows what he’s doing and the result will quite likely be nearly fatal to BL. Even if BL builds up, which will make it easier to rush from TL, this is still an extremely unfavorable situation to find oneself in.
BL
Scouting
Just like with TR it is important to block off all of the map you can as well as see as much of the map as possible, and guards are important than scouts. For BL guards are almost more important than for TR since BL doesn’t want TR to know which direction he is building or which direction he is rushing from until the last second.
Primary Scouting Order BL
- 1 guard left bridge
- 1 guard right bridge
- 1 scout TL
- 3 guards TL
- 1 scout BR
- 3 guards BR
- 1 dude to uncover special important gems
Insert Primary Guards
Picture
Notes on Primary Scouting Order
- This scouting order should effectively block off half the map from TR.
- On ww players were more concerned about scouts getting in from TL and BR corners and thus guards were went before scouts, however in these last few years without any path competition I have begun to slack off and am sending my scouts first.
- As with TR, hopefully if you send everyone fast enough and effectively use your time while the 2 groups of 3 guards are training, you should be able to stop all of you guards in the right places on the bridges and in the proper corner locations.
- If you are more concerned about scouts getting in, then send your first set of corner guards in the direction of the corner u are not building towards, i.e. BL up sends guards to BR, and BL right sends guards to TL first. This should decrease the likelihood of any scouts getting in.
- If you want to break across a bridge, the easiest thing to do is use 3 riflemen, possibly your bridge guard, gem uncoverer, and barracks sell dude to break across a bridge and see TR’s base. If you can kill TR’s bridge blasters with these dudes that is a major plus as well.
Weaknesses in Primary Scouting Order
- TR’s best chance to get in a scout is to use a grenader scout across the left bridge. This will never work if BL builds up, but it may work sometimes if BL builds right and isn’t fast.
- Since BL’s guards at the bridges have south advantage it can be relatively difficult for TR to break through BL’s bridge guards, but it can be done using 3 or more scouts acting together.
Secondary guard placements
Insert Secondary
guard placement pictures.
These secondary guard placements are also tolerable although generally if used they should be used with an earlier rush.
TL vs
BR